在Wonderland Engine中使用React创建3D UI
使用Wonderland Engine,集成基于React的3D UI元素变得简单。这份指南将引导您设置和使用@wonderlandengine/react-ui库,创建互动且高效的3D用户界面。
通过NPM安装
在项目根目录下运行以下命令以安装该库:
npm i @wonderlandengine/react-ui或者,编辑package.json,在"dependencies"部分添加"@wonderlandengine/react-ui": "latest",
Wonderland Editor会自动安装新的依赖项。
配置TypeScript
在项目的tsconfig.json文件中添加以下内容:
{
  "compilerOptions": {
    "jsx": "react"
  }
}配置esbuild
- 打开“Views > Project Settings > esbuildFlagsEditor”。
- 在标志中添加
--bundle。
配置流水线和材质
您需要设置三个流水线来渲染UI:
UI文本流水线
- 在现有的Text流水线上“右键> 复制”创建一个新的
Text流水线。 - 将其名称更改为
UI Text。 - 配置以下深度设置:勾选
depthTest和depthWrite;深度函数设置为always。

UI颜色流水线
- 通过复制现有的
Flat流水线来创建新的流水线。 - 将名称更改为
UI Color。 - 配置以下深度设置:勾选depthTest和depthWrite;深度函数设置为
always。

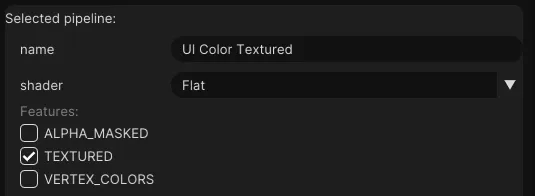
UI纹理颜色流水线
- 复制
UI Color流水线。 - 将其重命名为
UI Color Textured。 - 启用
TEXTURED功能。
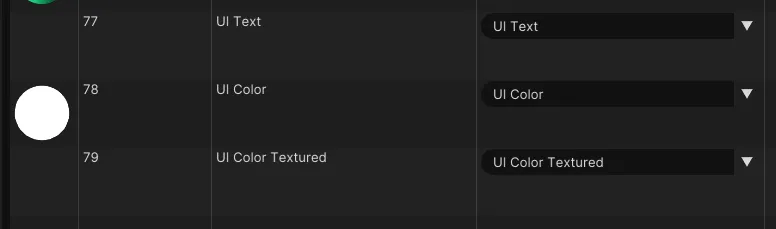
创建材质
- 在
Resources > Materials中创建三个新的材质。 - 将材质命名为
UI Text、UI Color和UI Color Textured。 - 将这些材质的流水线设置为前面创建的对应流水线。
创建React UI
在js文件夹中添加一个名为tutorial-ui.tsx的文件,并加入以下代码:
import {ReactUiBase} from '@wonderlandengine/react-ui';
import {Container, Text} from '@wonderlandengine/react-ui/components';
import React, {ReactNode} from 'react';

const App = (props: {comp: TutorialUI}) => {
    const comp = props.comp;

    return (
        <Container>
            <Text>Hello World</Text>
        </Container>
    );
}

export class TutorialUI extends ReactUiBase {
    static TypeName = 'tutorial-ui';
    static InheritProperties = true;

    render(): ReactNode {
        return <App comp={this} />;
    }
}
将UI添加到场景中
- 创建一个新对象。
- 将
tutorial-ui组件添加到此对象中。 - 将材质设置为之前创建的材质。
在场景视图上方使用绿色箭头浏览器中查看。
结论
您已成功设置@wonderlandengine/react-ui框架,在Wonderland Engine中创建基于React的3D UI。