Wonderland EngineでReactを使用した3D UI
Wonderland Engineでは、Reactをベースにした3D UI要素の統合が簡単になりました。このガイドでは、インタラクティブでパフォーマンスの高い3D UIを作成するための@wonderlandengine/react-uiライブラリの設定と使用方法をご紹介します。
NPMでのインストール
プロジェクトのルートディレクトリで次のコマンドを実行してライブラリをインストールします:
npm i @wonderlandengine/react-uiまたは、package.jsonを編集して"dependencies"セクションに"@wonderlandengine/react-ui": "latest"を追加します。Wonderland Editorは新しい依存関係を自動的にインストールします。
TypeScriptの設定
プロジェクトのtsconfig.jsonファイルに次の記述を追加します:
{
  "compilerOptions": {
    "jsx": "react"
  }
}esbuildの設定
- 「Views > Project Settings > esbuildFlagsEditor」を開きます。
- フラグに
--bundleを追加します。
パイプラインとマテリアルの設定
UIをレンダリングするために3つのパイプラインを設定する必要があります:
UIテキストパイプライン
- 既存のTextパイプラインを「右クリック > Duplicate」で複製して、新しい
Textパイプラインを作成します。 - 名前を
UI Textに変更します。 - 次のDepth設定を行います:
depthTestとdepthWriteをチェックし、depthFunctionをalwaysに設定します。

UIカラーパイプライン
- 既存のFlatパイプラインを複製して新しいものを作成します。
- 名前を
UI Colorに変更します。 - 同様に次のDepth設定を行います:depthTestとdepthWriteをチェックし、depthFunctionをalwaysに設定します。

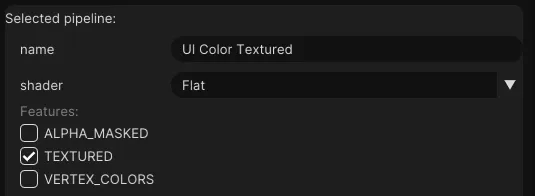
UIカラーテクスチャパイプライン
UI Colorパイプラインを複製します。- 名前を
UI Color Texturedに変更します。 TEXTURED機能を有効にします。
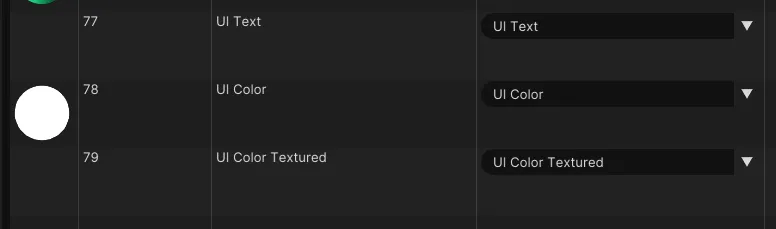
マテリアルの作成
Resources > Materialsで新しいマテリアルを3つ作成します。- それらの名前を
UI Text、UI Color、UI Color Texturedに変更します。 - これらのマテリアルのパイプラインを先に作成したパイプラインに設定します。
React UIの作成
jsフォルダにtutorial-ui.tsxという名前のファイルを追加し、次のコードを追加します:
import {ReactUiBase} from '@wonderlandengine/react-ui';
import {Container, Text} from '@wonderlandengine/react-ui/components';
import React, {ReactNode} from 'react';

const App = (props: {comp: TutorialUI}) => {
    const comp = props.comp;

    return (
        <Container>
            <Text>Hello World</Text>
        </Container>
    );
}

export class TutorialUI extends ReactUiBase {
    static TypeName = 'tutorial-ui';
    static InheritProperties = true;

    render(): ReactNode {
        return <App comp={this} />;
    }
}
シーンへのUI追加
- 新しいオブジェクトを作成します。
- このオブジェクトに
tutorial-uiコンポーネントを追加します。 - マテリアルを上記で作成したマテリアルに設定します。
シーンビュー上の緑色の矢印を使ってブラウザで起動します。
結論
これで、Wonderland EngineでReactを基にした3D UIを作成するための@wonderlandengine/react-uiフレームワークのセットアップが完了しました。