Interfaz 3D con React en Wonderland Engine
Con Wonderland Engine, integrar elementos de interfaz de usuario 3D basados en React se ha convertido en un proceso sencillo. Esta guía te llevará a través de la configuración y uso de la biblioteca @wonderlandengine/react-ui para crear interfaces 3D interactivas y de alto rendimiento.
Instalar vía NPM
Ejecuta el siguiente comando para instalar la biblioteca en el directorio raíz del proyecto:
npm i @wonderlandengine/react-uiO, edita package.json y añade "@wonderlandengine/react-ui": "lastest" en la sección "dependencies", el Editor de Wonderland instalará automáticamente las nuevas dependencias.
Configurar TypeScript
Añade lo siguiente al archivo tsconfig.json de tu proyecto:
{
  "compilerOptions": {
    "jsx": "react"
  }
}Configurar esbuild
- Abre “Vistas > Configuraciones del Proyecto > esbuildFlagsEditor”.
- Añade
--bundlea los flags.
Configurar Líneas de Proceso y Materiales
Necesitas configurar tres líneas de proceso para renderizar tu interfaz:
Línea de Proceso de Texto de UI
- Crea una nueva línea de proceso
Texthaciendo “Clic derecho > Duplicar” en la línea de proceso de Texto existente. - Cambia su nombre a
UI Text. - Configúrala con las siguientes configuraciones de Profundidad:
depthTestydepthWritemarcadas; función de profundidad configurada enalways.

Línea de Proceso de Color de UI
- Crea una nueva línea de proceso
Flatduplicando la existente. - Cambia su nombre a
UI Color. - Configúrala también con las siguientes configuraciones de Profundidad: depthTest y depthWrite marcadas; función de profundidad configurada en
always.

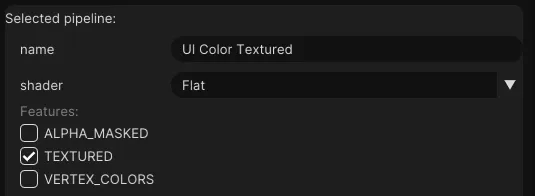
Línea de Proceso de Color Texturizado de UI
- Duplica la línea de proceso
UI Color. - Renombra esto a
UI Color Textured. - Activa la característica
TEXTURED.
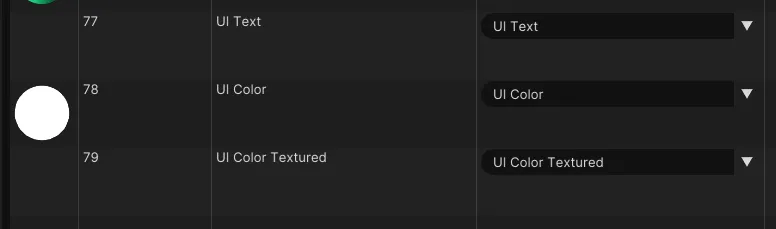
Crear Materiales
- Crea 3 nuevos materiales en
Recursos > Materiales. - Renombra los materiales a
UI Text,UI ColoryUI Color Textured. - Asigna las líneas de proceso de estos materiales a las creadas anteriormente.
Crear una Interfaz React
Añade un archivo llamado tutorial-ui.tsx a la carpeta js y añade el siguiente código:
import {ReactUiBase} from '@wonderlandengine/react-ui';
import {Container, Text} from '@wonderlandengine/react-ui/components';
import React, {ReactNode} from 'react';

const App = (props: {comp: TutorialUI}) => {
    const comp = props.comp;

    return (
        <Container>
            <Text>Hola Mundo</Text>
        </Container>
    );
}

export class TutorialUI extends ReactUiBase {
    static TypeName = 'tutorial-ui';
    static InheritProperties = true;

    render(): ReactNode {
        return <App comp={this} />;
    }
}
Añadir la Interfaz a la Escena
- Crea un nuevo objeto.
- Añade el componente
tutorial-uia este objeto. - Asigna los materiales a los materiales creados anteriormente.
Lanza en el navegador usando la flecha verde encima de la vista de la escena.
Conclusión
Has configurado exitosamente el marco @wonderlandengine/react-ui para crear una interfaz 3D basada en React en Wonderland Engine.