Wonderland Engine 1.0.0 JavaScript Migration
Wonderland Engine has been undergoing massive improvements to how it handles, interacts with, and distributes JavaScript code.
This blog post will guide you through those changes. In addition, the Migrations section will go over each new feature to detail migration steps for your pre-1.0.0 project.
Motivation
Until now, Wonderland Engine’s default bundler relied on concatenating local scripts. Users would create scripts, and the editor would pick them up and bundle them to create the final application. It was required to pre-bundle any third-party libraries, and place them in the project’s folder structure.
Alternatively, it was possible to set up NPM projects, but the setup was manual and artists in the team would be required to set up NodeJS and follow steps to install dependencies and more.
The new system has several advantages:
- Support for NPM package dependencies by default
- Way better completion suggestions from your IDE
- Way easier integration with advanced tooling, such as TypeScript
- Compatibility with other WebAssembly libraries
- Multiple Wonderland Engine instances per page
- Automatic management of your NPM project for non-dev team members.
We have been working on a new JavaScript ecosystem to help you work seamlessly with your favorite tools.
Editor Components
If you were previously an NPM user, chance is that you might have encountered this:

Starting with version 1.0.0, the editor no longer picks component types from the application bundle. Besides fixing the above error, it editor lists more components than may be registered in the final application. This will allow advanced users to setup complex projects with streamable components in the future.
With this change, the editor will now require:
- To list the components or folders in
Views > Project Settings > JavaScript > sourcePaths - To add dependencies in the root
package.jsonfile
Example of package.json with a library exposing components:
The editor is now capable of finding components by reading your package.json to speed up development time and improve shareability.
For more information, please have a look at the Writing JavaScript Libraries tutorial.
Bundling
A new setting allows modifying the bundling process:
Views > Project Settings > JavaScript > bundlingType
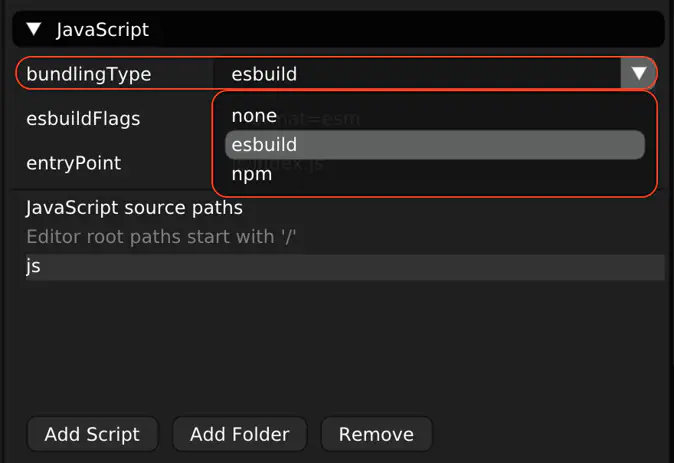
Let’s have a look at each of these options:
esbuild
Your scripts are going to be bundled using the esbuild bundler.
This is the default choice. You are advised to stick to this setting whenever you can for performance reasons.
npm
Your scripts are going to be bundled using your own npm script.
Example of package.json with a custom build script:
1{
2 "name": "MyWonderfulProject",
3 "version": "1.0.0",
4 "description": "My Wonderland project",
5 "type": "module",
6 "module": "js/index.js",
7 "scripts": {
8 "build": "esbuild ./js/index.js --bundle --format=esm --outfile=\"deploy/MyWonderfulProject-bundle.js\""
9 },
10 "devDependencies": {
11 "esbuild": "^0.15.18"
12 }
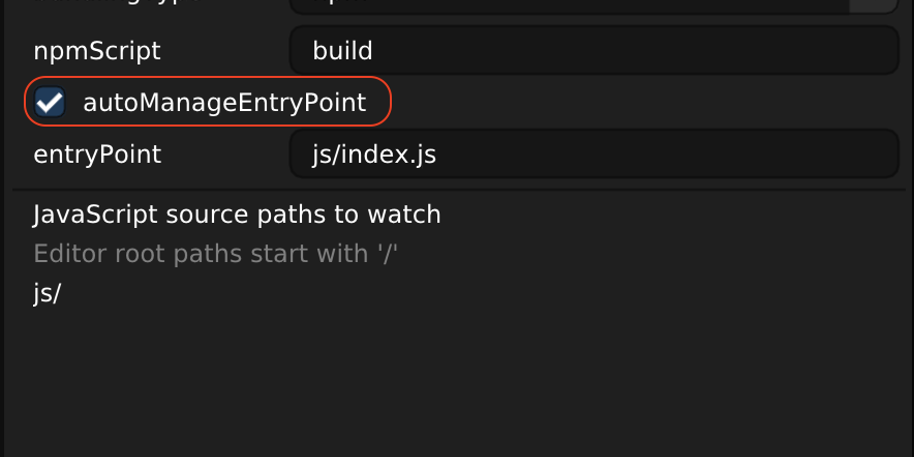
13}The npm script name can be set in the editor settings:
Views > Project Settings > JavaScript > npmScript

This script can run any command, as long as it generates your final application bundle.
You can use your favorite bundler, such as Webpack or Rollup. However, we advise users to use tools like esbuild to reduce iteration time.
Application Entry Point
Components are registered differently in the runtime, i.e., when running in the browser.
For runtime, the editor can automatically manage the entry point of your application, i.e., an index.js file.
The editor uses a template that roughly looks like:
 1/* wle:auto-imports:start */
 2/* wle:auto-imports:end */
 3
 4import {loadRuntime} from '@wonderlandengine/api';
 5
 6/* wle:auto-constants:start */
 7/* wle:auto-constants:end */
 8
 9const engine = await loadRuntime(RuntimeBaseName, {
10    physx: WithPhysX,
11    loader: WithLoader,
12});
13
14// ...
15
16/* wle:auto-register:start */
17/* wle:auto-register:end */
18
19engine.scene.load(`${ProjectName}.bin`);
20
21/* wle:auto-benchmark:start */
22/* wle:auto-benchmark:end */
This template is automatically copied into newly created and old pre-1.0.0 projects.
The template comes with the following tags:
wle:auto-imports: Delimits where import statements should be writtenwle:auto-register: Delimits where registration statements should be writtenwle:auto-constants: Delimits where the editor will write constants, e.g.,ProjectName: Name listed in the project’s.wlpfileWithPhysX: A boolean enabled if the physics engine is enabledWithLoader: A boolean enabled if runtime loading of glTF should be supported
As an example:
 1/* wle:auto-imports:start */
 2import {Forward} from './forward.js';
 3/* wle:auto-imports:end */
 4
 5import {loadRuntime} from '@wonderlandengine/api';
 6
 7/* wle:auto-constants:start */
 8const ProjectName = 'MyWonderland';
 9const RuntimeBaseName = 'WonderlandRuntime';
10const WithPhysX = false;
11const WithLoader = false;
12/* wle:auto-constants:end */
13
14const engine = await loadRuntime(RuntimeBaseName, {
15  physx: WithPhysX,
16  loader: WithLoader
17});
18
19// ...
20
21/* wle:auto-register:start */
22engine.registerComponent(Forward);
23/* wle:auto-register:end */
24
25engine.scene.load(`${ProjectName}.bin`);
26
27// ...
This index file is auto generated for a project with a single component called Forward, defined in js/forward.js.
It is important to note that the editor will only import and register components that are used in the scene, i.e., attached to an object.
If your application uses a component only at runtime, you will either need to:
- Mark them as dependencies. More information in the Component Dependencies section
- Manually import them in your
index.jsfile
For simple applications, this template file will be enough and no modification will be necessary. For more complex uses cases,
you are free to create and manage your own index.js file by removing the tag comments.
Managing the index file manually allows you to create applications will multiple entry points, and to register components that the editor doesn’t know about.
JavaScript Classes
Wonderland Engine 1.0.0 comes with a new way to declare components: ES6 Classes.
 1import {Component, Property} from '@wonderlandengine/api';
 2
 3class Forward extends Component {
 4    /* Registration name of the component. */
 5    static TypeName = 'forward';
 6    /* Properties exposed in the editor. */
 7    static Properties = {
 8        speed: Property.float(1.5)
 9    };
10
11    _forward = new Float32Array(3);
12
13    update(dt) {
14        this.object.getForward(this._forward);
15        this._forward[0] *= this.speed;
16        this._forward[1] *= this.speed;
17        this._forward[2] *= this.speed;
18        this.object.translate(this._forward);
19    }
20}
There are a couple of things to note:
- We no longer use a global
WLsymbol, but use the API from@wonderlandengine/apiinstead - We create a class that inherits from the API
Componentclass - The registration name of the component is now a static property
- The properties are set on the class
JavaScript Properties
Object literal properties have been replaced by functors:
 1import {Component, Property} from '@wonderlandengine/api';
 2
 3class MyComponent extends MyComponent {
 4    /* Registration name of the component. */
 5    static TypeName = 'forward';
 6    /* Properties exposed in the editor. */
 7    static Properties = {
 8        myFloat: Property.float(1.0),
 9        myBool: Property.bool(true),
10        myEnum: Property.enum(['first', 'second'], 'second'),
11        myMesh: Property.mesh()
12    };
13}
Component Dependencies
Dependencies are components that are automatically registered when your component is registered.
Let’s add a Speed component to the Forward example:
 1import {Component, Type} from '@wonderlandengine/api';
 2
 3class Speed extends Component {
 4    static TypeName = 'speed';
 5    static Properties = {
 6        value: Property.float(1.5)
 7    };
 8}
 9
10class Forward extends Component {
11    static TypeName = 'forward';
12    static Dependencies = [Speed];
13
14    _forward = new Float32Array(3);
15
16    start() {
17      this._speed = this.object.addComponent(Speed);
18    }
19
20    update(dt) {
21        this.object.getForward(this._forward);
22        this._forward[0] *= this._speed.value;
23        this._forward[1] *= this._speed.value;
24        this._forward[2] *= this._speed.value;
25        this.object.translate(this._forward);
26    }
27}
Upon Forward registration, Speed will automatically be registered because it is listed as a dependency.
This behavior is managed by the boolean autoRegisterDependencies on the WonderlandEngine object created in index.js.
Events
Wonderland Engine used to handle events using arrays of listeners, e.g.:
WL.onSceneLoadedWL.onXRSessionStartWL.scene.onPreRenderWL.scene.onPreRender
The engine now comes with an Emitter class to facilitate interactions on event:
You can manage your listeners using an identifier:
For more information, please have a look at the Emitter API documentation.
Object
The Object has not been left out of this entire rework. It underwent changes making the API more consistent, and safer.
Export Name
The Object class is now exported as Object3D. This change was performed to prevent shadowing the JavaScript Object constructor.
To smooth out the migration, Object will still be exported, but ensure you are now using
1import {Object3D} from '@wonderlandengine/api';in order to facilitate future migrations.
Transforms
The transformation API hasn’t been spared either. The engine is now deprecating the use of getters & setters (accessors) for transformation:
These getters / setters came with a few drawbacks:
- Consistency: Not following other transformation API
- Performance: Allocating
Float32Arrayon each call - Safety: Memory views could be altered by other component
- Potential bug when storing the
Float32Arrayreference for later read
- Potential bug when storing the
If you are eager to see the new API, please read the Object Transform section.
JavaScript Isolation
For users using the internal bundler, you might have seen code such as:
component-a.js
component-b.js
The above code is making some assumptions about the componentAGlobal variable. It expects component-a to be registered first and prepended in the bundle.
This used to work because the Wonderland Engine internal bundler didn’t perform isolatation.
With 1.0.0, whether you use esbuild or npm, this will not work anymore. Bundlers will not be able to make the link between componentAGlobal used in component-a and the one used in component-b;
As a rule of thumb: Think about each file as isolated when using a bundler.
Migrations
Some manual migrations steps are required depending on whether your project was using npm or not.
Each section will describe the appropriate steps required based on your previous setup.
Editor Components (#migration-editor-components)
Internal Bundler
For users previously using the internal bundler, i.e., with the useInternalBundler checkbox activated:
Views > Project Settings > JavaScript > useInternalBundler
No further step is required.
Npm
https://www.npmjs.com/package/wle-js-upgrade
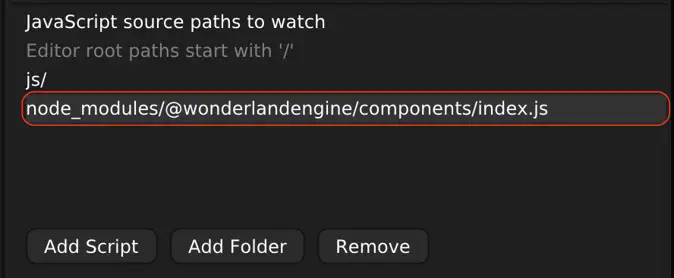
For npm users, you will need to ensure that your own scripts are listed in the sourcePaths setting.
If you are using a library, please ensure that it’s been migrated to Wonderland Engine 1.0.0 following the Writing JavaScript Libraries tutorial.
In case one of your dependency isn’t up-to-date, you can add the local path to the node_modules folder in the sourcePaths settings. Example:
Always keep in mind that the generated bundle via npm or esbuild will not be used anymore to find the components in the editor. It will only be used when running your application.
Bundling
No further step is required. The project should automatically be migrated.
JavaScript Classes, Properties, & Events
This section is the same for all users, whether you used to have useInternalBundler enabled or not.
Let’s have a look at some code comparing the old way versus the new way:
Before 1.0.0
 1WL.registerComponent('player-height', {
 2    height: {type: WL.Type.Float, default: 1.75}
 3}, {
 4    init: function() {
 5        WL.onXRSessionStart.push(this.onXRSessionStart.bind(this));
 6        WL.onXRSessionEnd.push(this.onXRSessionEnd.bind(this));
 7    },
 8    start: function() {
 9        this.object.resetTranslationRotation();
10        this.object.translate([0.0, this.height, 0.0]);
11    },
12    onXRSessionStart: function() {
13        if(!['local', 'viewer'].includes(WebXR.refSpace)) {
14            this.object.resetTranslationRotation();
15        }
16    },
17    onXRSessionEnd: function() {
18        if(!['local', 'viewer'].includes(WebXR.refSpace)) {
19            this.object.resetTranslationRotation();
20            this.object.translate([0.0, this.height, 0.0]);
21        }
22    }
23});
After 1.0.0
 1/* Don't forget that we now use npm dependencies */
 2import {Component, Property} from '@wonderlandengine/api';
 3
 4export class PlayerHeight extends Component {
 5    static TypeName = 'player-height';
 6    static Properties = {
 7        height: Property.float(1.75)
 8    };
 9
10    init() {
11        /* Wonderland Engine 1.0.0 is moving away from a global
12         * instance. You can now access the current engine instance
13         * via `this.engine`. */
14        this.engine.onXRSessionStart.add(this.onXRSessionStart.bind(this));
15        this.engine.onXRSessionEnd.add(this.onXRSessionEnd.bind(this));
16    }
17    start() {
18        this.object.resetTranslationRotation();
19        this.object.translate([0.0, this.height, 0.0]);
20    }
21    onXRSessionStart() {
22        if(!['local', 'viewer'].includes(WebXR.refSpace)) {
23            this.object.resetTranslationRotation();
24        }
25    }
26    onXRSessionEnd() {
27        if(!['local', 'viewer'].includes(WebXR.refSpace)) {
28            this.object.resetTranslationRotation();
29            this.object.translate([0.0, this.height, 0.0]);
30        }
31    }
32}
Those two examples are equivalent and will lead to the same result.
You will note a difference for the line 5:
1WL.onXRSessionStart.push(this.onXRSessionStart.bind(this));versus
1this.engine.onXRSessionStart.add(this.onXRSessionStart.bind(this));Because we now migrated to npm dependencies and standard bundling, there is no need for a global WL variable.
Having a globally exposed engine came with two limitations:
- Harder to share components
- Impossible to have multiple engine instances running
While the second bullet point is not a common use case, we don’t want to limit any users in terms of scalability.
Object Transform
The new API is based on the usual pattern used throughout Wonderland Engine:
The translation, rotation, and scaling components are now following this pattern as well:
As for the rest of the api, using an emtpy
outparameter for getters will lead to the creation of the output array. Note that it’s always better to re-use arrays when possible (for performance reasons).
In addition to be able to read & write the object local space transformations, you can as well directly operate on world space:
For more information, please have a look at the Object3D API documentation. (TODO: Replace Link)
JavaScript Isolation
This section is the same for all users, whether you used to have useInternalBundler enabled or not.
There are multiple ways to share data between components, and it’s up to the developer of the application to choose the most appropriate one.
We will give a few examples about sharing data that do not rely on global variables.
State in Components
Components are bags of data that are accessed via other components.
You can thus create components to hold the state of your application. As an example, if you are creating a game with three states:
- Running
- Won
- Lost
You can create a singleton component with the following shape:
game-state.js
The GameState component can then be added to a manager object. This object should then be referenced by components that will alter the state of the game.
Let’s create a component to change the state of the game when a players dies:
player-health.js
 1import {Component, Type} from '@wonderlandengine/api';
 2
 3import {GameState} from './game-state.js';
 4
 5export class PlayerHealth extends Component {
 6  static TypeName = 'player-health';
 7  static Properties = {
 8    manager: {type: Type.Object},
 9    health: {type: Type.Float, default: 100.0}
10  };
11  update(dt) {
12    /* The player died, change the state. */
13    if(this.health <= 0.0) {
14      const gameState = this.manager.getComponent(GameState);
15      gameState.state = 2; // We set the state to `lost`.
16    }
17  }
18}
This is one way demonstrating how to replace globals in your pre-1.0.0 application.
Exports
It’s also possible to share variables via import and export. However, remember that the object is going to be identical in the entire bundle.
We can revisit the above example with exports:
game-state.js
player-health.js
 1import {Component, Type} from '@wonderlandengine/api';
 2
 3import {GameState} from './game-state.js';
 4
 5export class PlayerHealth extends Component {
 6  static TypeName = 'player-health';
 7  static Properties = {
 8    manager: {type: Type.Object},
 9    health: {type: Type.Float, default: 100.0}
10  };
11  update(dt) {
12    if(this.health <= 0.0) {
13      GameState.state = 'lost';
14    }
15  }
16}
This solution works, but isn’t bulletproof.
Let’s have a look at an example where this doesn’t work. Let’s image that this code is in a library called gamestate.
- Your application depends on
gamestateversion 1.0.0 - Your application depends on library
A - Library
Adepends ongamestateversion 2.0.0
Your application will end up with two copies of the gamestate library, because both aren’t compatible in terms of version.
When library A updates the GameState object, it is in fact changing its own instances of this export. This happens because both versions aren’t compatible, making your application bundle two different instances of the library.
Final Word
With this guide, you are now ready to migrate your projects to Wonderland Engine 1.0.0!
If you encounter any issue, please reach out to the community on the Discord server.